A dashboard prompt is a special filter that filters analyses embedded in a dashboard. There are two various prompts and this topic discusses the Named and Inline Prompts. You will learn to create a Named Prompt in your dashboard.
The prompt created at the dashboard level is called a Named prompt, because, the prompt is created outside of a specific dashboard and stored in the catalog as a prompt object, which can then be applied to any dashboard or dashboard page that contains the columns, which are specified in the prompt. It can filter one or any number of analyses embedded on the same dashboard page. You can create and save these named prompts to a private folder or a shared folder.
- A named prompt is interactive and will always appear on the dashboard page so that the user can prompt for different values without having to rerun the dashboard.
- A named prompt can also interact with selection steps. You can
specify a dashboard prompt to override a specific selection step.
The step will be processed against the dashboard column with the user-specified data values collected by the dashboard column prompt, whereas all other steps will be processed as originally specified.
Creating a Named Dashboard Prompt
Named prompts in the Catalog can be applied to any dashboard or dashboard page that contains the columns specified in the prompt.To create a named dashboard prompt, perform the following steps:
| 1 . |
Create a named dashboard prompt for region that specifically filters the data for APAC. Click New > Dashboard Prompt on the global header and then select the A- Sample Sales subject area.  The Definition pane appears. The Definition pane allows you to add, organize, and manage a named prompt's columns. You can use column prompts, image prompts (maps), currency prompts, and variable prompts. The Definition table lets you view high-level information about the prompt's columns. You can also use this table to select columns for editing or deleting, arrange the order in which the prompts appear to the user, or insert row or column breaks between prompt items. The Display pane is a preview pane that allows you to view the prompt's layout and design. 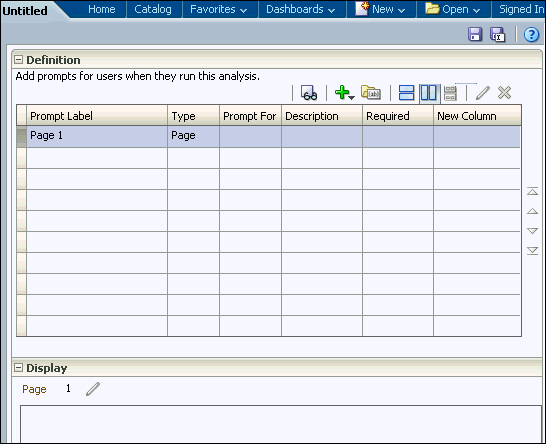 |
|---|---|
| 2 . |
a. In the Definition pane, click the New prompt icon ( ), and select Column Prompt. ), and select Column Prompt.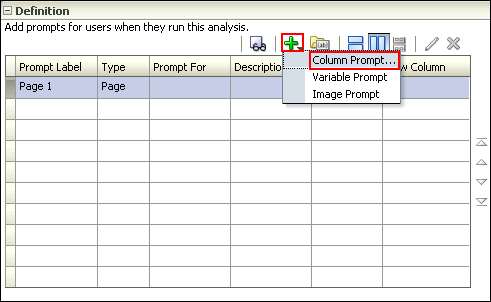 b. Select C50 Region as the column for the prompt, and click OK. 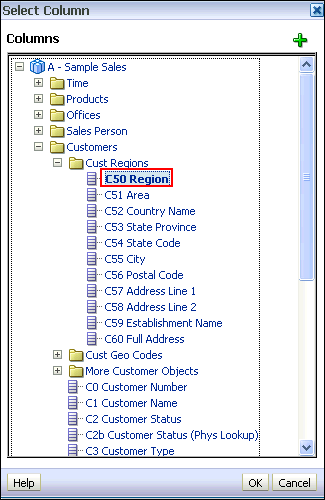 c. The New Prompt: C50 Region dialog box appears. The Prompt for Column field allows you to view information about the column that you selected as the prompt. This appears only for column prompts. 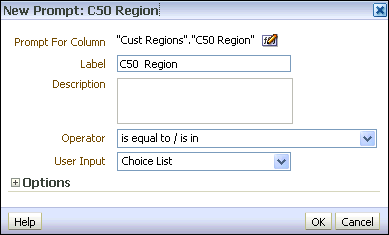 The Label text box allows you to enter a meaningful label that appears on the dashboard next to the prompt. Enter Select a Region: in the the Label text box (add a space following the colon). You can optionally enter a description. d. Select the operator. Accept the default, which is "is equal to / is in." This field is only for column prompts. e. The User Input field's drop-down list appears for column and variable prompts and provides you with the option to determine the User Input method for the user interface—in other words, the user will see one of the following: check boxes, radio buttons, a choice list, or a list box. You use this item in conjunction with the Choice List Values item to specify which data values appear for selection. For example, if you selected the User Input method of Choice List and the Choice List Values item of All Column Values, the user will select the prompt's data value from a list that contains all of the data values contained in the data source. Accept the default, Choice List. f. The Options section provides you with the opportunity to constrain values available for selection. Click the plus sign to expand the Options section. Because you selected Choice List for the User Input field, you must now indicate those values. Some of your choices include All Column Values, Specific Column Values (where you supply those values), SQL Results (choose a list of values based on a SQL statement), and so on. Accept the default, All Column Values. g. The series of check boxes allows you to restrict the amount of data returned. Select the Enable user to select multiple values, and Require user input check boxes. Allowing multiple selection of values lets you choose more than one value (region, for example), and requiring input forces you to enter at least one value. "Default selection" allows you to select an initial value, and "Set a variable" allows you to create a new variable that this column prompt will populate. Accept the default, None, for both of these fields. The New Prompt dialog box should look like this: 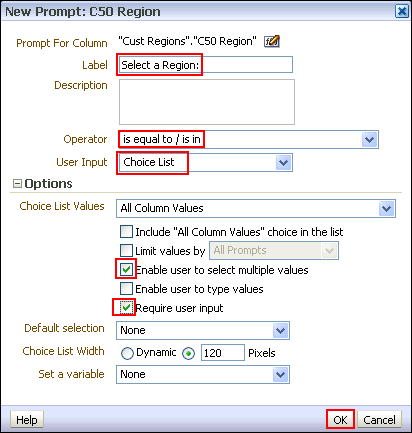 h. Click OK. |
| 3 . |
The prompt is added to the Definition pane.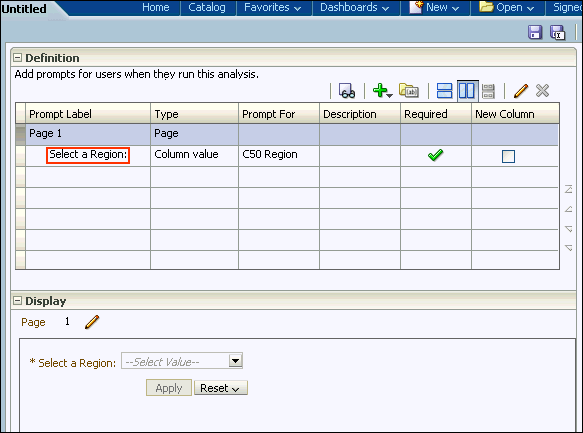 Save the prompt in the Regional Revenue folder as Region prompt. 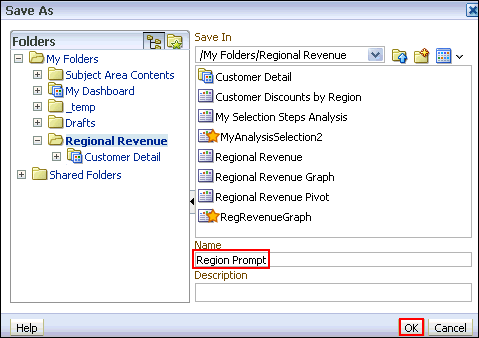 |
| 4 . |
Test the prompt. Navigate to My Dashboard - Customer Detail and open it in the Dashboard builder. Recall that the "Customer Discounts by Region" analysis has a Narrative view associated with it that is specifically set to the value of Americas. Use Page Options > Edit Dashboard to open the Dashboard builder. Navigate to select Region Prompt from the catalog pane. 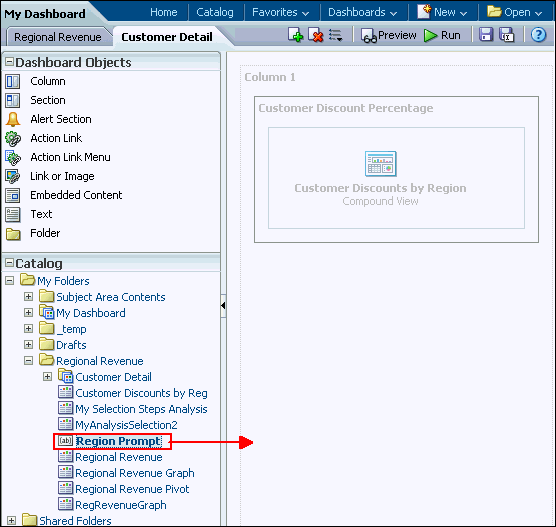 |
| 5 . |
Drag Region Prompt to
Column 1, above the "Customer Discounts by Region" analysis. 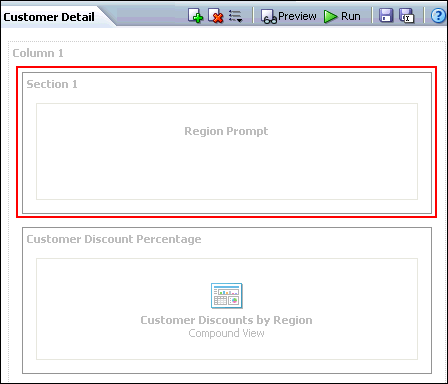 |
| 6 . |
Click the Region Prompt properties icon and select Scope
> Page. Scope determines whether the prompt applies to the
entire dashboard or just this page.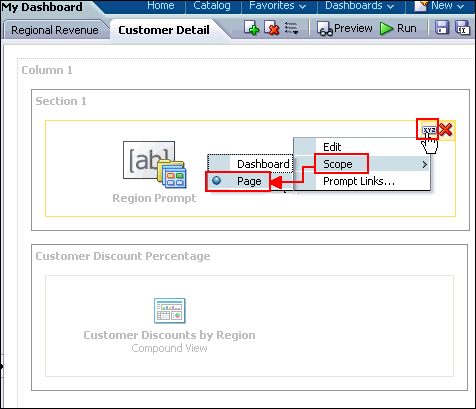 |
| 7 . |
a. Save and run the dashboard. Initially,
the filters for the analysis that you created earlier are assumed; that
is, the analysis is filtered for Americas region.  b. Select APAC from your dashboard prompt. 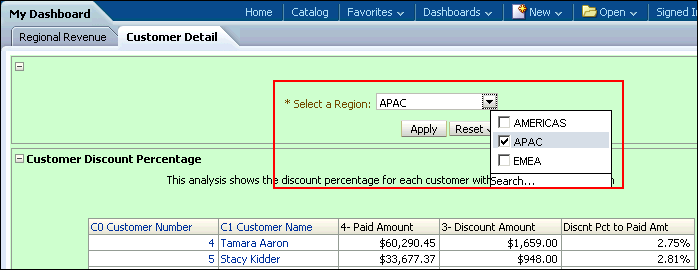 c. Click Apply. The region value changes for this page. d. Observe the change in the region in the dashboard display: 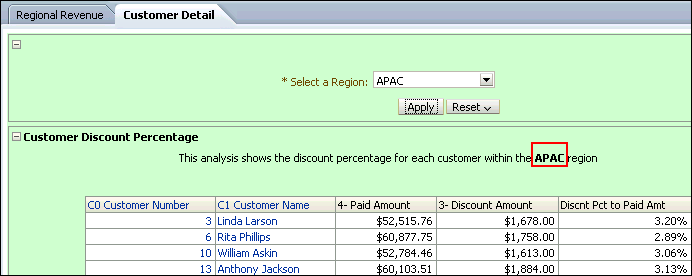 You can try selecting other values in the prompt. Then click Apply to rerun the dashboard prompt. |
Managing Prompts
You can now manage prompts with different options.- You can choose to show or hide a prompt's apply and reset buttons. If the designer chooses to hide the apply button, then the specified prompt value is immediately applied to the dashboard or analysis.
- The prompt Reset button now provides three reset options: Reset to last applied values, Reset to default values, and Clear All.
- The row-based layout prompt option is added to the prompt editor's "Definition pane". You can now display your prompts in a row or in a column.
|
1
. |
Create an analysis with filters. a. Create an anlysis with the following columns:
 b. Create filter for T05 Per Name Year and D50 Region. Click the More link for T05 Per Name Year. In the New Filter dialog box, select is prompted as the operators. Click OK. 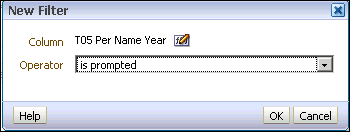 c. Similarly, create a filter for D50 Region. Your analysis should look like this: 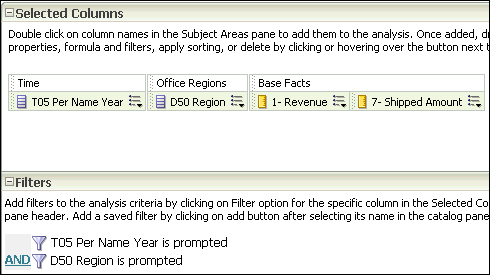 d. Save the analysis as My Regional Stats. |
||||||||||
|---|---|---|---|---|---|---|---|---|---|---|---|
|
2
. |
Create a dashboard prompt for year and region. Click New > Dashboard Prompt on the global header and then select the A - Sample Sales subject area. |
||||||||||
|
3
. |
a. In the Definition pane, click the New
prompt icon (),
and select Column Prompt. b. Select T05 Per Name Year from the Time folder, and click OK.  |
||||||||||
|
4
. |
In the New Prompt dialog box, enter the label as "Year: ".
Click OK. |
||||||||||
|
5
. |
The prompt is added to the Definition table. |
||||||||||
|
6
. |
Similarly, add another prompt for D05 Region. In the New Filter
dialog box, label the prompt as "Region: ". You should now
have two prompts in the Definition table.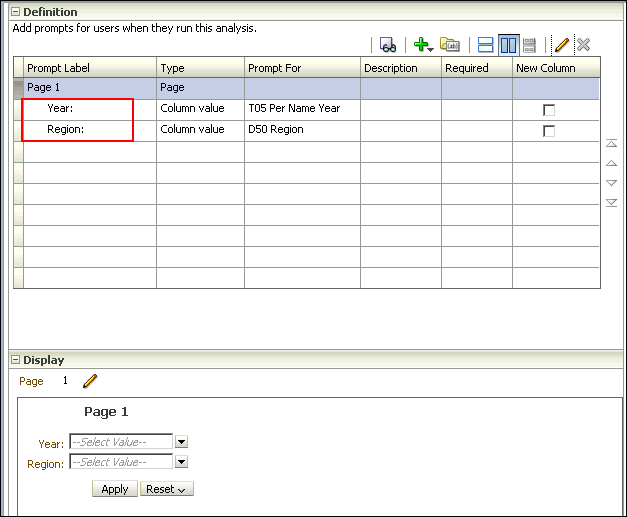 |
||||||||||
|
7
. |
Click the row-based layout at the top and notice that the prompts are
laid out horizontally in the Display section.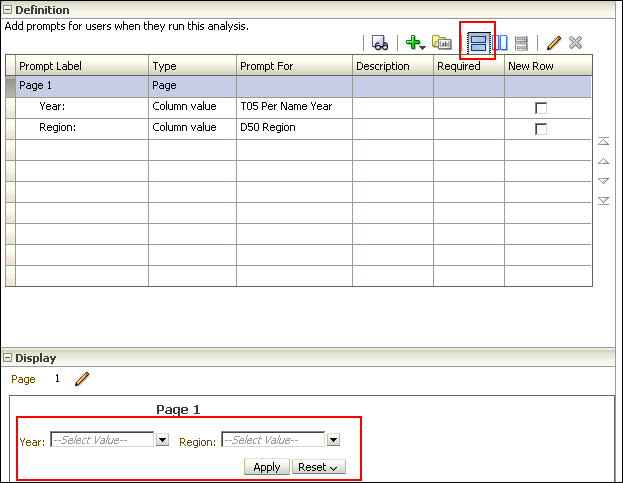 |
||||||||||
|
8
. |
Save the prompt in the Regional Revenue folder as
My Prompt. |
||||||||||
|
9
. |
Select Page 1 row in the Definition table and click the pencil
 icon to edit the page properties.
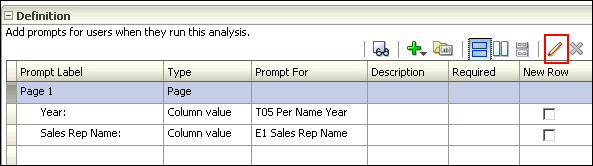 |
||||||||||
|
10
. |
In the Edit Page Settings dialog box, change Prompt Display to Place
label above prompt. Deselect the Show Apply button and Show Reset
button check boxes. The Edit Page Settings dialog box should look like
this: Click OK. Observe that the buttons have been removed from the Display section. Save the prompt. 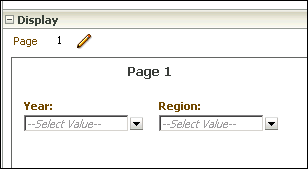 |
||||||||||
|
11
. |
Open My Dashboard and add a new page. Use Page
Options > Edit Dashboard to open the Dashboard builder.
Click the Add Dashboard page icon. 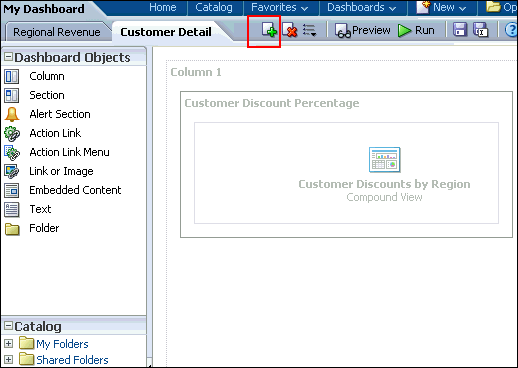 |
||||||||||
|
12
. |
In the Add Dashboard Page dialog box, enter Region Stats as
the page name and click OK.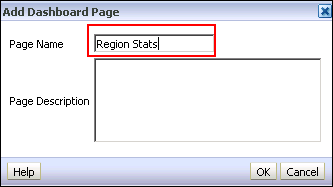
|
||||||||||
|
13
. |
In the new page, drag My Prompt
and My Region Stats from My Folders>Regional Revenue folder,
to the dasboard page.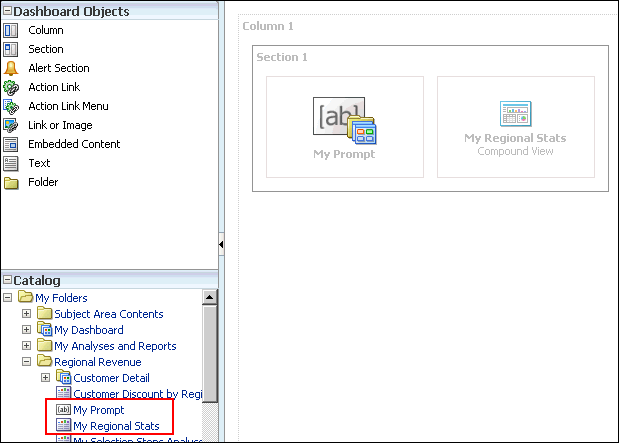 |
||||||||||
|
14
. |
Save My Dashboard and click Run. The dashboard appears.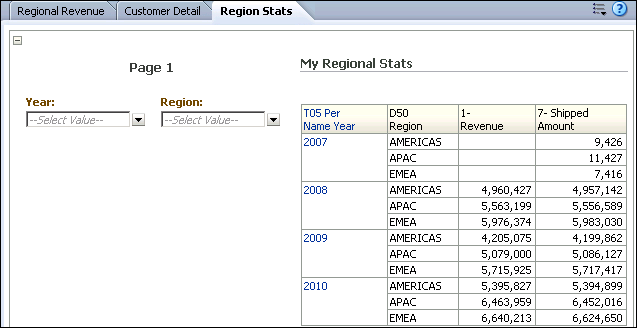 |
||||||||||
|
15
. |
Select 2009 as the year and click anywhere on the dashboard.
The query runs immediately and returns with data for only 2009. |
||||||||||
|
16
. |
Select EMEA as the Region and click any where on the dashboard.
The dashboard refreshes with Year as 2009 and Region as EMEA. |
||||||||||
|
17
. |
Select Page Options>Edit Dashboard. Click the Tools icon
and select Prompts Buttons on Current Page>Apply Buttons>Show
All Apply Buttons.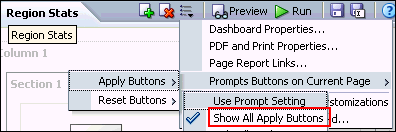 |
||||||||||
|
18
. |
Click the Tools icon and select Prompts Buttons on
Current Page>Reset Buttons>Show All Reset Buttons.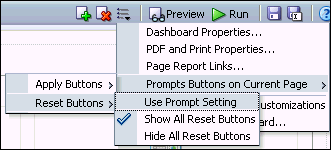 |
||||||||||
|
19
. |
Save the dashboard and run it again. This time both the Apply
and Reset buttons are displayed.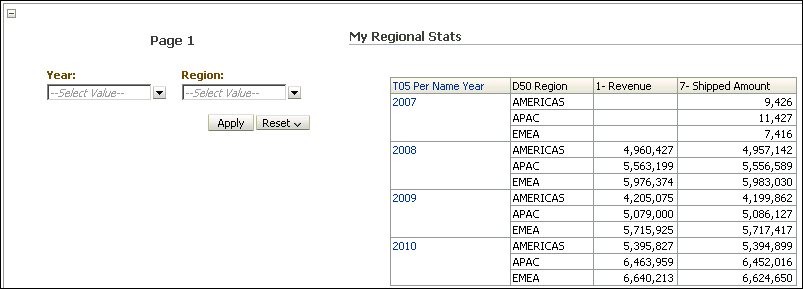 |


No comments:
Post a Comment