Showing posts with label security. Show all posts

OBIEE Data Security – Column Level Security


Oracle BI aka OBIEE offers a wide variety of data security, of which column level security is a flavor. Consider a column that has sensitive information like Social Security Number. This information should not be presented to all in the organization except the select few who need to have this info. You can actually hide the column in the presentation layer from others. You can use this column in reports on dashboards and people with access to this column will see it in report for others the report will not show this column. To achieve this functionality we need to make changes in two places – Metadata and one time change in NQSConfig.ini.

Let us first see what needs to be done in Metadata. For this example, let us consider that EmployeeID is a scared piece of information that a select few MegaUsers can see and access.

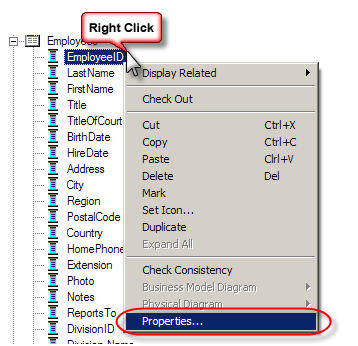
In Metadata on the presentation column, we need to make changes to permission settings. Right click on the column and select “Properties”
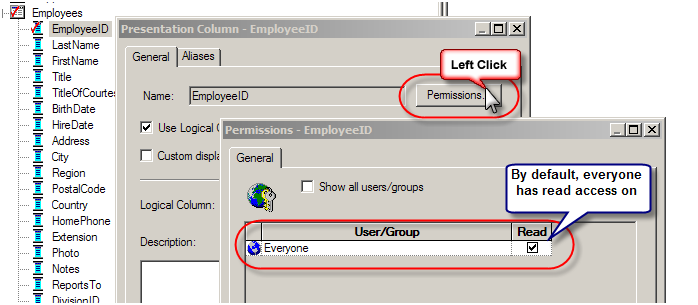
By default, the columns will have read access to everyone.
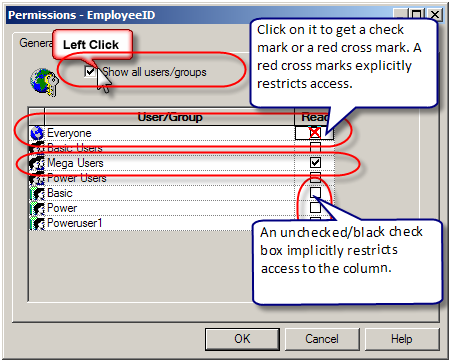
Choose the groups that should have read access rights on the column. The check box here works like a toggle button. Click on it to get a check mark or a red cross mark. A red cross marks explicitly restricts access. While an unchecked/black check box implicitly restricts access to the column.
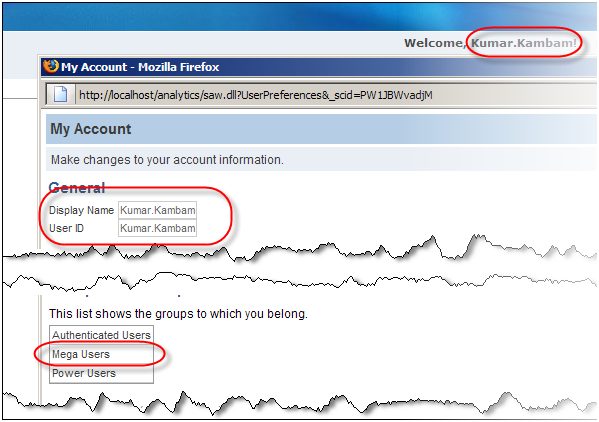
Now let us log in as a Mega User (Kumar.Kambam, in this case) and create a report using the EmployeeID Column.
In answers, Kumar.Kambam can see the EmployeeID Column. Let us create a simple report using the column with column level security enforced.
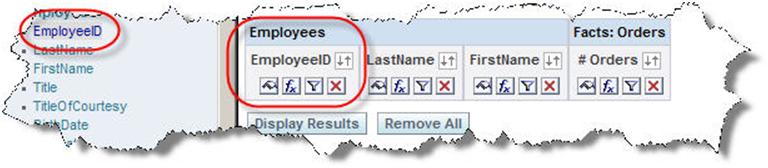

Save it and put it on a dashboard to test OBIEE column level security.
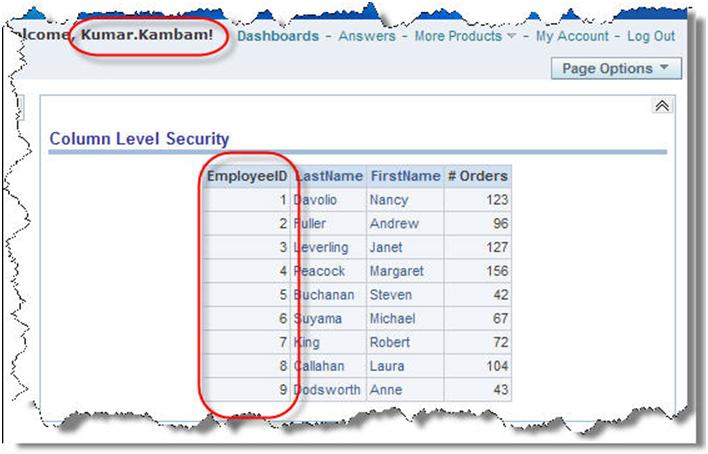

Now log on as Basic User

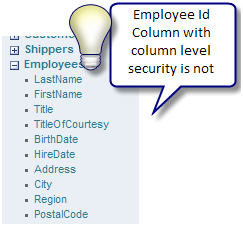
In answers check for EmployeeID column. The column is not visible. This is due to the column level security restriction.
Go to OBIEE Security Dashboard to see the report, and we get an error message. State: HY000. Code: 10058. [NQODBC] [SQL_STATE: HY000] [nQSError: 10058] A general error has occurred. [nQSError: 27005] Unresolved column: “Employees”.”EmployeeID”. (HY000)
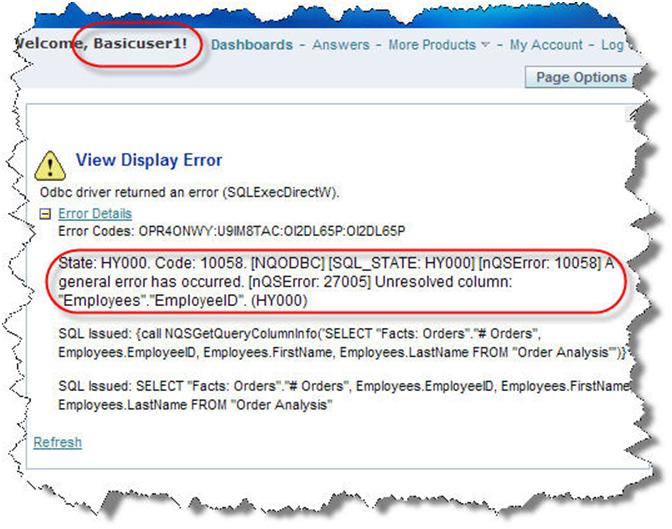
The error is expected. The report contains a column on which the current user does not have access to. So for all practical purposes as far as OBIEE is concerned, the column does not even exist. The default setting in NQSConfig.ini file drives this behavior.
In, NQSConfig.ini change the parameter PROJECT_INACCESSIBLE_COLUMN_AS_NULL which is under security section. By default it is set to No. Set it to yes. And restart the services.
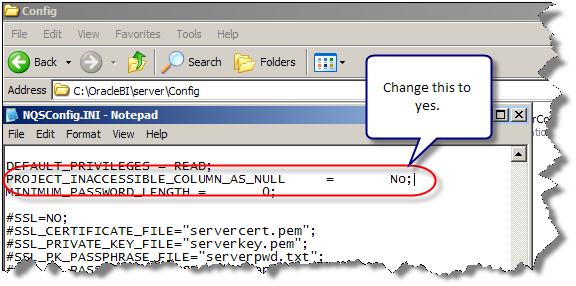
Now logged in as BasicUser1 and access OBIEE Security Dashboard to test OBIEE column level security
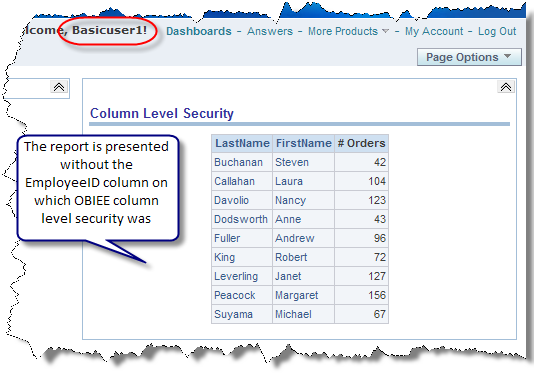
The report is presented without the EmployeeID column on which OBIEE column level security was enforced.
So for the same dashboard report, depending on the data level security access permissions in OBIEE for a user, a column visibility can be controlled using column level security feature.

Security in OBIEE


Security
Security is very important topic in OBIEE.
Benefits of Security
  • Data needs to be protected so that only authorized employees can access sensitive information.
  • Employees can automatically see the information that is relevant to their roles.
  • Security provides the ability to authenticate users through log on.
  • Secure access controls on object and data level.
User’s Account can be defined explicitly in
-  An Oracle BI server Repository
-  An External Source ( Such as a database table or an LDAP Server)
How to Add User to the Repository
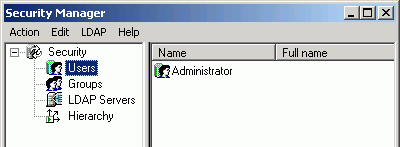
Go to Admin tool > Manage > Security > User > Right Click in right pane > New User
or
We can go to Admin tool > Manage > Security > Action > New > User
security 1
Now Double click on User and Window ” User” will appear.
Security 2
Setting User Permissions and Logons
To set User a permissions click on Permissions button I have marked with red Square.
Security 3
and one window will appear  like this ,
Security 4
Here  from the screen shot we can allow & denied the permission.
To Specify  specific database logon IDs for one or more databases. Enter the appropriate logon ID and password for the user in the logon Tab of the USER Dialog Box.
See the below 2 screen shot for logon tab.
Security 3
Once you click on Logon , Another window will appear like this,
Security 5 JPG
Administrator  Account is a permanent user account in every Oracle BI Server Repository.
It can not be deleted or modified.  We can just change the password or logging level.
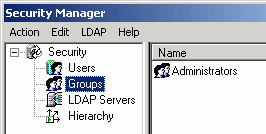
Group
A group is a set of security attributes . We can use security manager to create groups and then grand membership in them to users or other groups.
Administrator is a predefined group with authority to access and modify any object in repository.Also in Administrator group, there is always a administrator member by default.
We can unlimited number of groups in repository. And Each group can contain explicitly granted privileges, Implicitly granted privileges through membership in another group.
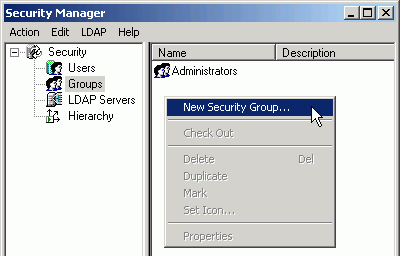
Same as adding a User we can add Group. See below 2 screen shots.
Security 6
Now from the below screen shot we can get idea about how to create group.
Security 7
Authentication
Authentication is the process by which a system verifies, using a User ID and Password, that a user has a necessary permissions to logon and access the data.
Oracle BI Server authenticates each connection request that it receives.
Oracle BI Server authenticates following authentication types.
  • Operating System
  • External table
  • LDAP
  • Database
  • Internal
Setting Query Limits
We can use Query limit tab for several reasons
  1. we can control number of rows receiver by user
  2. we can control maximum query run time
  3. we can enable or disable populate privileges
  4. we can enable or disable Direct Database requests.
From below scree shot you will get the exact idea what I am talking about.
Security 9
Setting Time Period Restrictions
Now To set timing Restrictions click on Expression builder under Restrict column. See in below screen shot I have highlighted it. with Blue color.
Security 11
From below screen shot we can get the idea how we can restrict access to a database during particular time periods.
Security 12
To select a time period, click the start time and drag to the end time.
According to access click on allow and disallow.
Setting filters
Limit queries by setting up filters on objects for a user or group. From Expression Builder we can set fil

Data level Security


To test the initialization block and session variables, perform the following steps:

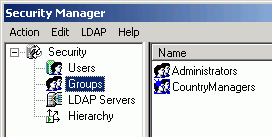
1.Click Manage > Security to open the Security Manager.
2.Click Groups in the left pane.
3.Right-click the white space in the right pane and select New Security Group.
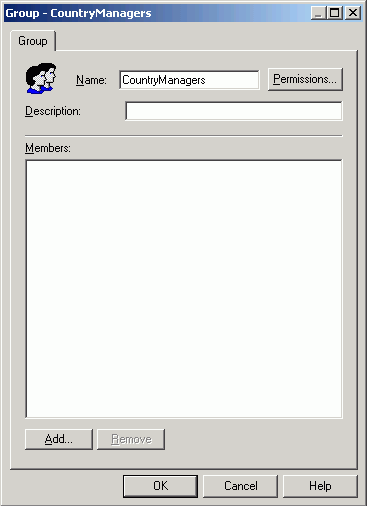
4.Name the group CountryManagers.
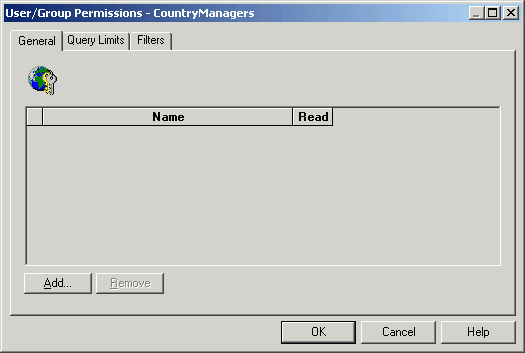
5.Click the Permissions button to open the User / Group Permissions dialog box.
6.Click the Filters tab.
7.Click the Add button.
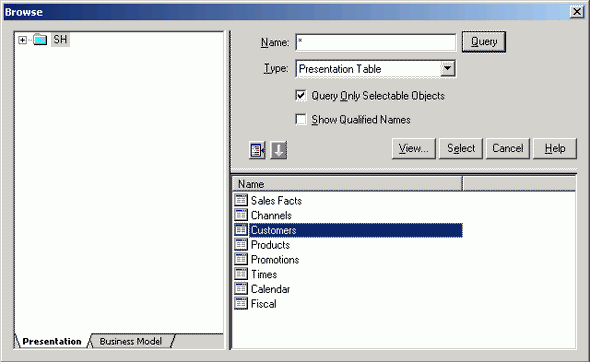
8.Click the Customers presentation table.
9.Click Select to add Customers to the User / Group Permissions dialog box.
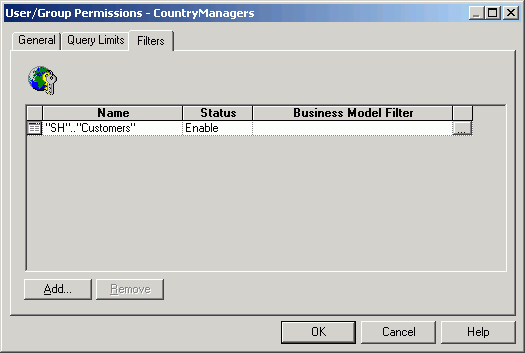
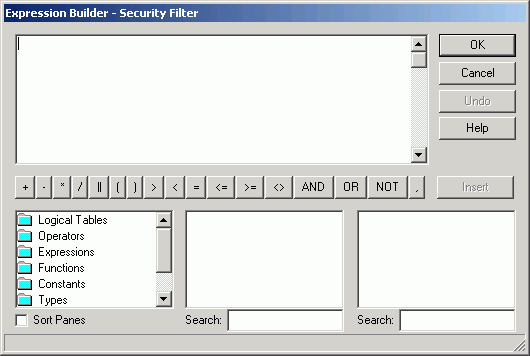
10.Click the Expression Builder button (three dots) on the right to open the Expression Builder (you may need to scroll to see the button).
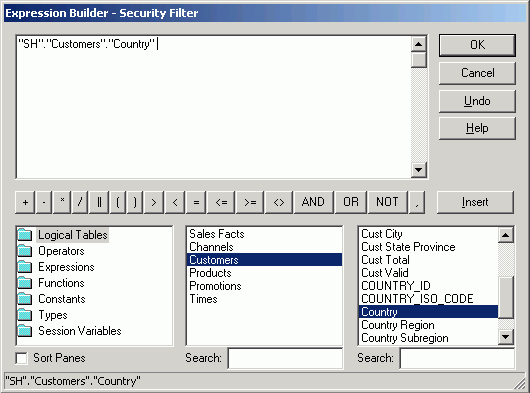
11.Select Logical Tables > Customers > Country and then click the Insert button to add Country to the formula.
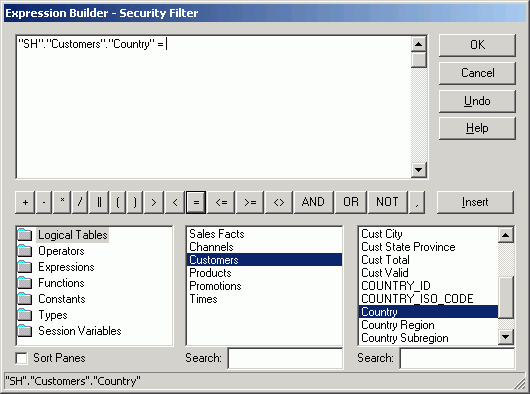
12.Click the = operator to add it to the formula.
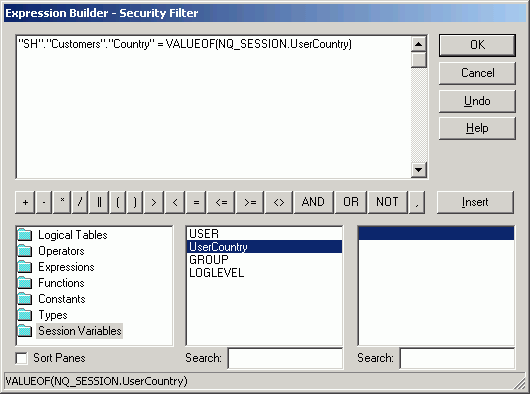
13.Select Session Variables > UserCountry and click the Insert button to add UserCountry to the formula as an argument in the VALUEOF()function.
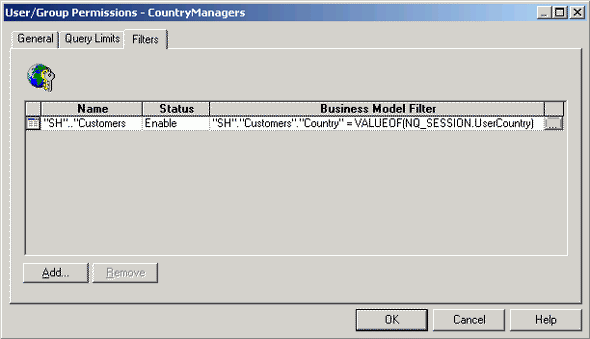
14.Click OK to close the Expression Builder. The filter is added in the User / Group Permissions dialog box.
15.Click OK to close the User / Group Permissions dialog box.
16.Click OK to close the Group dialog box. CountryManagers is added as a group in the Security Manager.
17.Click Action > Close to close the Security Manager.
18.Check in changes.
19.Save the repository.
20.Return to Answers.
21.Log out of Answers.
22.Test the initialization block by logging in to Answers as one of the users in the initialization block: KurtKeiko,Charles, or Karen.
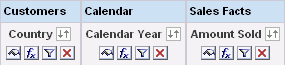
23.Create the following query:
Customers.Country, Times.Calendar.Calendar Year, Sales Facts.Amount Sold.
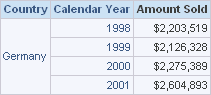
24.Click Results. The results of the query should correspond to the the user's country (Kurt = Germany, Keiko = Japan, Charles = United Kingdom, Karen = United States of America). The picture shows the results when the user = Kurt.
25.Leave Answers open.

Managing Query Execution Privileges


The Oracle BI Server allows you to exercise varying degrees of control over the repository information that a user can access.
Controlling query privileges allows you to manage the query environment. You can put a high level of query controls on users, no controls, or somewhere in between. The following list contains some types of activities you may want to limit:
  • Restricting query access to specific objects, including rows and columns, or time periods
    • Objects. If you explicitly deny access to an object that has child objects, the user will be denied access to the child objects. For example, if you explicitly deny access to a particular physical database object, you are implicitly denying access to all of the physical tables and physical columns in that catalog.
      If a user or group is granted or disallowed privileges on an object from multiple sources (for example, explicitly and through one or more groups), the privileges are used based on the order of precedence, as described in Group Inheritance.
      You can grant or disallow the ability to execute direct database requests for a user or group.
    • Time periods. If you do not select a time period, access rights remain unchanged. If you allow or disallow access explicitly in one or more groups, the user is granted the least restrictive access for the defined time periods. For example, suppose a user is explicitly allowed access all day on Mondays, but belongs to a group that is disallowed access during all hours of every day. This means that the user will have access on Mondays only.
  • Controlling runaway queries by limiting queries to a specific number of rows or maximum run time
  • Limit queries by setting up filters for an object
All restrictions and controls can be applied at the user level, at the group level, or a combination of the two.
To limit queries by objects for a user or group
  1. From the Administration Tool menu bar, choose Manage > Security.
  2. In the Security Manager dialog box, in the tree pane, select Users or Groups.
  3. In the right pane, right-click the name that you want to change and select Properties.
  4. In the User or Group dialog box, click Permissions.
  5. In the User/Group Permissions dialog box, click the General tab and perform the following steps:
    1. In the General tab, to explicitly allow or disallow access to one or more objects in the repository, click Add.
    2. In the Browse dialog box, in the Name list, select the objects you want to change, and then click Select.
    3. In the User/Group Permissions dialog box, assign the permissions by selecting or clearing the Read check box for each object.
      (Default is a check) If the check box contains a check, the user has read privileges on the object. If the check box contains an X, the user is disallowed read privileges on the object. If it is blank, any existing privileges (for example, through a group) on the object apply.
      For more information about assigning permissions, refer to Setting Permissions for Repository Objects.
  6. To explicitly allow or disallow populate privilege or the ability to execute direct database requests for specific database objects, perform the following steps:
    1. Click the Query Limits tab and select the database.
    2. In the Populate Privilege drop-down list, select Allow or Disallow.
      NOTE:  For the selected user or group, this overrides the database property Allow populate queries for all.
    3. To explicitly allow or disallow the ability to execute direct database requests for specific database objects, in the Execute Direct Database Requests drop-down list, select Allow or Disallow.
      NOTE:  For the selected user or group, this overrides the database property Allow direct database requests for all.
  7. Click OK twice to return to the Security Manager dialog box.
To limit queries by number of rows received by a user or group
  1. From the Administration Tool menu bar, choose Manage > Security.
  2. In the Security Manager dialog box, in the tree pane, select Users or Groups.
  3. In the right pane, right-click the name that you want to change and select Properties.
  4. In the User or Group dialog box, click the Permissions tab.
  5. In the User/Group Permissions dialog box, click the Query Limits tab and expand the dialog box to view all columns.
  6. To specify or change the maximum number of rows each query can retrieve from a database, in the Query Limits tab, perform the following steps:
    1. In the Max Rows column, type the maximum number of rows.
    2. In the Status Max Rows field, select a status using Table 39 as a guide.
  7. Click OK twice to return to the Security Manager dialog box.
To limit queries by maximum run time or to time periods for a user or group
  1. From the Administration Tool menu bar, choose Manage > Security.
  2. In the Security Manager dialog box, in the tree pane, select Users or Groups.
  3. In the right pane, right-click the name that you want to change and select Properties.
  4. In the User or Group dialog box, click the Permissions tab.
  5. In the User/Group Permissions dialog box, click the Query Limits tab and expand the dialog box to view all columns.
  6. To specify the maximum time a query can run on a database, in the Query Limits tab, perform the following steps:
    1. In the Max Time column, select the number of minutes.
    2. From the Status Max Time drop-down list, select a status using Table 39 as a guide.
  7. To restrict access to a database during particular time periods, in the Restrict column, click the ellipsis button.
  8. In the Restrictions dialog box, perform the following steps:
    1. To select a time period, click the start time and drag to the end time.
    2. To explicitly allow access, click Allow.
    3. To explicitly disallow access, click Disallow.
  9. Click OK twice to return to the Security Manager dialog box.
To limit queries by setting up a filter on an object for a user or group
  1. From the Administration Tool menu bar, choose Manage > Security.
  2. In the Security Manager dialog box, in the tree pane, select Users or Groups.
  3. In the right pane, right-click the name that you want to change and select Properties.
  4. In the User or Group dialog box, click Permissions.
  5. In the User/Group Permissions dialog box, click the Filters tab.
  6. In the Filters tab, to add an object to filter, perform the following steps:
    1. Click Add.
    2. In the Browse dialog box, in the Names list, locate and double-click the object on which you want to filter.
    3. Select the object and click Select.
  7. In the User/Group Permissions Filters dialog box, perform the following steps:
    1. Scroll to the right to view the Business Model Filter column.
    2. Click the Business Model Filter ellipsis button for the selected object.
  8. In the Expression Builder dialog box, create a logical filter, and then click OK.
  9. In the User/Group Permissions Filters dialog box, from the Status drop-down list, select a status using Table 39 as a guide.
  10. Click OK twice to return to the Security Manager dialog box.
    Table 39. Query Privileges Status Fields
    Status
    Description
    Disable
    • Status Max Rows or Status Max Time. When selected, disables any limits set in the Max Rows or Max Time fields.
    • Filter. The filter is not used and no other filters applied to the object at higher levels of precedence (for example, through a group) are used.
    Enable
    • Status Max Rows or Status Max Time. This limits the number of rows or time to the value specified. If the number of rows exceeds the Max Rows value, the query is terminated.
    • Filter. The filter is applied to any query that accesses the object.
    Ignore
    • Status Max Rows or Status Max Time. Limits will be inherited from the parent group. If there is no row limit to inherit, no limit is enforced.
    • Filter. The filter is not in use, but any other filters applied to the object (for example, through a group) are used. If no other filters are enabled, no filtering will occur.

Assigning Populate Privilege to a User or Group

When a criteria block is cached, the Populate Stored procedure writes the Cache/Saved Result Set value to the database.
NOTE:  Any Marketing user who writes a cache entry or saves a result set needs to be assigned the POPULATE privilege for the target database. All Marketing segmentation users and groups need to be assigned this privilege. Typically, all Marketing users are associated with a group and this group is granted the privilege. For more information about marketing cache, refer to the topic about setting up cache for target levels in the documentation for Oracle's Siebel Marketing application.
To assign Populate privilege to a user or group
  1. From the Administration Tool menu bar, choose Manage > Security.
  2. In the Security Manager dialog box, in the tree pane, select Users or Groups.
  3. In the right pane, right-click the name that you want to change and select Properties.
  4. In the User or Group dialog box, click Permissions.
  5. In the User/Group Permissions dialog box, select the Query Limits tab.
  6. In the Query Limits list, expand the dialog box to view all columns.
  7. From the Populate Privilege drop-down list, select Allow or Disallow.
    NOTE:  For all Marketing data warehouses, set Populate Privilege to Allow.
  8. Click OK twice to return to the Security Manager dialog box. 

Order of Authentication


If the user does not type a logon name, then OS authentication is triggered, unless OS authentication is explicitly turned off in the NQSConfig.INI file. For more information, refer to Oracle Business Intelligence Enterprise Edition Deployment Guide. Additionally, OS authentication is not used for Oracle BI Presentation Services users.
The Oracle BI Server populates session variables using the initialization blocks in the desired order that are specified by the dependency rules defined in the initialization blocks. If the server finds the session variable USER, it performs authentication against an LDAP server or an external database table, depending on the configuration of the initialization block with which the USER variable is associated.
Oracle BI Server internal authentication (or, optionally, database authentication) occurs only after these other possibilities have been considered.

Maintaining Oracle BI Server User Authentication


You can maintain lists of users and their passwords in the Oracle BI repository using the Administration Tool. The Oracle BI Server will attempt to authenticate users against this list when they log on unless another authentication method has already succeeded, or database authentication has been specified in the NQSConfig.INI file.
Refer to Order of Authentication for additional information.
The Oracle BI Server user IDs are stored in nonencrypted form in an Oracle BI repository and are caseinsensitive. Passwords are stored in encrypted form and are casesensitive. The Oracle BI Server user IDs can be used to access any business model in a repository provided that the users have the necessary access privileges. User IDs are valid only for the repository in which they are set up. They do not span multiple repositories.
NOTE:  If you are using LDAP or external table authentication, passwords are not stored in the Oracle BI repository.
For information about configuring user authentication, refer to Oracle Business Intelligence Enterprise Edition Deployment Guide.

Changing Oracle BI Server User Passwords

You can change user passwords in the Administration Tool.
To change a user password
  1. Select Manage > Security.
  2. In the Security Manager dialog box, select Users in the left pane.
  3. In the right pane, right-click the user whose password you want to change.
  4. Select Properties from the shortcut menu.
  5. In the User tab, type the new password.
  6. In the Confirm Password text box, type the password again, and then click OK

Delivers and Database Authentication


In Oracle BI Applications, users are always created in the operational application database, never in the Oracle BI repository. The Oracle BI repository is preconfigured for database authentication.
Oracle BI Scheduler Server runs Delivers jobs for users without accessing or storing their passwords. Using a process called impersonation, the Scheduler uses one user ID and password with Oracle BI Administrator privileges that can act on behalf of other users. The Scheduler initiates an iBot by logging on to Oracle BI Presentation Services with that Oracle BI Administrator ID and password.
For Delivers to work, all database authentication must be performed in only one connection pool, and that connection pool can only be selected in an initialization block for the USER system session variable. This is typically called the Authentication Initialization Block. When impersonation is used, this initialization block is skipped. All other initialization blocks must use connection pools that do not use database authentication.
CAUTION:  Using an authentication initialization block is the only initialization block in which it is acceptable to use a connection pool in which :USER and :PASSWORD are passed to a physical database.
For other initialization blocks, SQL statements can use :USER AND :PASSWORD. However, because Oracle BI Scheduler Server does not store user passwords, the WHERE clause must be constructed as shown in the following example:
select username, groupname, dbname, schemaname from users
where username=':USER'
NQS_PASSWORD_CLAUSE(and pwd=':PASSWORD')NQS_PASSWORD_CLAUSE
NOTE:  When impersonation is used, everything in the parentheses is extracted from the SQL statement at runtime.
For more information, refer to the Oracle BI Delivers examples in Selecting and Testing the Data Source and Connection Pool.

Database Authentication


The Oracle BI Server can authenticate users through database logons. If a user has read permission on a specified database, the user will be trusted by the Oracle BI Server. Unlike operating system authentication, this authentication can be applied to Oracle BI Presentation Services users. For information, refer to About Oracle BI Delivers and Database Authentication.
Database authentication can be used in conjunction with external table authentication. If external table authentication succeeds, then database authentication is not performed. If external table authentication fails, then database authentication is performed.
Database authentication requires the user ID to be stored in the Oracle BI repository.
To set up database authentication
  1. Create users in the repository named identically to the users in a database. Passwords are not stored in the repository.
  2. Assign the permissions (including group memberships, if any) you want the users to have.
  3. Specify the authentication database in the Security section of the NQSConfig.INI file.
    For more information, see Oracle Business Intelligence Infrastructure Installation and Configuration Guide.
  4. Create a DSN for the database.
  5. Import the database into the Physical layer. You do not need to import the physical table objects. The database name in the Physical layer has to match the database name in the NQSConfig.INI file (as specified in Step 3).
  6. Set up the connection pool without a shared logon.
When a user logs on to the Oracle BI Server, the server attempts to use the logon name and password to connect to the authentication database using the first connection pool associated with it. If this connection succeeds, the user is considered to be authenticated successfully.
If the logon is denied, the Oracle BI Server issues a message to the user indicating an invalid user ID or password

External Table Authentication


Instead of storing user IDs and passwords in an Oracle BI repository, you can maintain lists of users and their passwords in an external database table and use this table for authentication purposes. The external database table contains user IDs and passwords, and could contain other information, including group membership and display names used for Oracle BI Presentation Services users. The table could also contain the names of specific database catalogs or schemas to use for each user when querying data.
NOTE:  If a user belongs to multiple groups, the group names should be included in the same column separated by semicolons.
External table authentication can be used in conjunction with database authentication. If external table authentication succeeds, then database authentication is not performed. If external table authentication fails, then database authentication is performed.
Refer to Setting Up Database Authentication, and Order of Authentication for additional details.
External table authentication uses Oracle BI session variables that you define using the Variable Manager of the Administration Tool. For more information about the Variable Manager, refer to Using the Variable Manager.
Session variables get their values when a user begins a session by logging on. Certain session variables, called system variables, have special uses. The variable USER is a system variable that is used with external table authentication.
To set up external table authentication, you define a system variable called USER and associate it with an initialization block that is associated with an external database table. Whenever a user logs in, the user ID and password will be authenticated using SQL that queries this database table for authentication. After the user is authenticated successfully, other session variables for the user could also be populated from the results of this SQL query. For more information about session variables, refer to Understanding and Creating Session Variables.
The presence of a defined system variable USER determines that external authentication is done. Associating USER with an external database table initialization block determines that the user will be authenticated using the information in this table. To provide other forms of authentication, associate the USER system variable with an initialization block associated with a LDAP server or XML source. For more information, refer to Setting Up LDAP Authentication.
To set up external table authentication
  1. Import information about the external table into the Physical layer. In this illustration, the database sql_nqsecurity contains a table named securitylogons and has a connection pool named External Table Security.
  2. Select Manage > Variables to open the Variable Manager.
  3. Select Initialization Blocks on the left tree pane.
  4. Right-click on white space in the right pane, and then click on New Initialization Block from the right-click menu.
  5. In the Initialization Block dialog box, type the name for the initialization block.
  6. Select Database from the Data Source Connection drop-down list.
  7. Click Browse to search for the name of the connection pool this block will use.
  8. In the Initialization String area, type the SQL statement that will be issued at authentication time.
    The values returned by the database in the columns in your SQL will be assigned to variables. The order of the variables and the order of the columns will determine which columns are assigned to which variables. Consider the SQL in the following example:
    select username, grp_name, SalesRep, 2 from securitylogons where username = ':USER' and pwd = ':PASSWORD'
    This SQL contains two constraints in the WHERE clause:
    • :USER (note the colon) equals the ID the user entered when logging on.
    • :PASSWORD (note the colon again) equals the password the user typed.
      The query will return data only if the user ID and password match values found in the specified table.
      You should test the SQL statement outside of the Oracle BI Server, substituting valid values for :USER and :PASSWORD to verify that a row of data returns.
  9. If this query returns data, the user is authenticated and session variables will be populated. Because this query returns four columns, four session variables will be populated. Create these variables (USER, GROUP, DISPLAYNAME, and LOGLEVEL) by clicking New in the dialog's Variables tab.
    If a variable is not in the desired order, click on the variable you want to reorder and use the Up and Down buttons to move it.
  10. Click OK to save the initialization block. 

Popular Posts