| 1 . | Select the five alias tables in the Physical layer.  |
|---|---|
| 2 . | Right-click one of the highlighted alias tables and select Physical Diagram > Selected Object(s) Only to open the Physical Diagram. Alternatively, you can click the Physical Diagram button on the toolbar. |
| 3 . | Rearrange the alias table objects so they are all visible.  |
| 4 . | You may want to adjust the objects in the Physical Diagram.
If so, use the toolbar buttons to zoom in, zoom out, fit the diagram,
collapse or expand objects, select objects, and so forth: |
| 5 . | Click the New Join button on the toolbar. |
| 6 . | Click the F1 Revenue table and then the D1 Time table.
The Physical Foreign Key dialog box opens. It matters which table you
click first. The join creates a one-to-many (1:N) relationship that
joins the key column in the first table to a foreign key column in the
second table. |
| 7 . | Select the D1 Time. CALENDAR_DATE column, and then select F1 Revenue.BILL_DAY_DT to join the tables. Ensure that the Expression edit box (at the bottom) contains the following expression: "orcl".""."BISAMPLE"."D1 Time"."CALENDAR_DATE" = "orcl".""."BISAMPLE"."F1 Revenue"."BILL_DAY_DT" 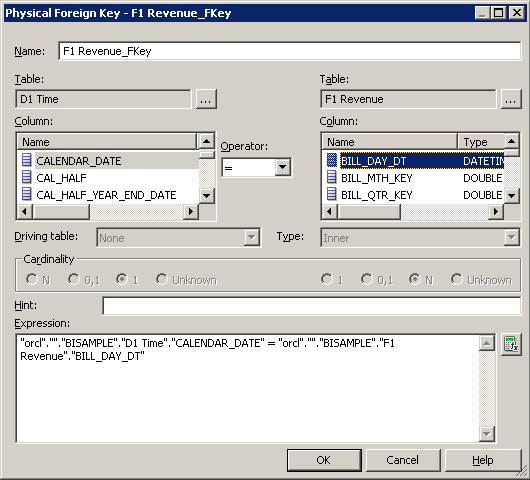 |
| 8 . | Click OK to close the Physical Foreign Key dialog box. The join is visible in the Physical Diagram.  Please be aware of the following upgrade considerations for Oracle BI EE 11g Release 1 (11.1.1.5): Joins in the Physical and Business Model diagrams are now represented by a line with an arrow at the "one" end of the join, rather than the line with crow�s feet at the "many" end of the join that was used in previous releases. When creating joins in the Physical and Business Model Diagrams, you now select the "many" end of the join first, and then select the "one" end of the join. In previous releases, joins in the diagrams were created by selecting the "one" end of the join first. |
| 9 . | Repeat the steps to create joins for the remaining tables.
Use the following expressions as a guide. Please notice that D4 Address
joins to D3 Customer. "orcl".""."BISAMPLE"."D2 Product"."PROD_KEY" = "orcl".""."BISAMPLE"."F1 Revenue"."PROD_KEY" "orcl".""."BISAMPLE"."D3 Customer"."CUST_KEY" = "orcl".""."BISAMPLE"."F1 Revenue"."CUST_KEY" "orcl".""."BISAMPLE"."D4 Address"."ADDRESS_KEY" = "orcl".""."BISAMPLE"."D3 Customer"."ADDRESS_KEY" |
| 10 . | Click the Auto Layout button on the toolbar.  |
| 11 . | Your diagram should look similar to the screenshot:.  |
| 12 . | Click the X in the upper right corner to close the Physical Diagram. |
| 13 . | Select File > Save or click the Save button on the toolbar to save the repository.  |
| 14 . | Click No when prompted to check global
consistency. Checking Global Consistency checks for errors in the
entire repository. Some of the more common checks are done in the
Business Model and Mapping layer and Presentation layer. Since these
layers are not defined yet, bypass this check until the other layers
in the repository are built. You learn more about consistency check
later in this tutorial.  |
| 15 . | Leave the Administration Tool and the repository open for the next topic. Congratulations! You have successfully created a new repository, imported a table schema from an external data source into the Physical layer, created aliases, and defined keys and joins. In the next topic you learn how to build the Business Model and Mapping layer of a repository. |
OBIEE 11G Create Keys and Joins
Subscribe to:
Post Comments (Atom)
Popular Posts
-
How to get a difference between two dates (in terms ) of days,weeks,months what every it may be The below formula gives you no.of days b...
-
In this topic you create time series calculation measures using Oracle BI time series functions. Time series functions include AGO, T...
-
https://forums.oracle.com/forums/search.jspa?forumID=378&threadID=&q=%22timestampadd%22+&objID=f378&dateRange=all&userI...
-
It is recommended to create a dedicated connection pool for initialization blocks. For more information, refer to Creating or Changing Con...
-
In this topic, you learn how to create an analysis with a Pivot Table view, format, add a calculated column to a pivot table, add a...
-
A presentation variable can be created as part of the process for creating a column prompt or a variable prompt. When the presentat...
-
OBIEE BMM Layer Design Principles / Best Practices There are certain design principles or best practices oracle suggest in de...
-
Calculating grand total column or % of grand total is easy in pivot table view. But how can I create the same in a table view? ...
-
A Column Selector view adds a column selector to the results. A column selector is a drop-down list from which users can dynamically...


No comments:
Post a Comment